Homebrew and Anaconda: Configuring for Apple M1 and Intel Silicon

Homebrew and Anaconda: Configuring for Apple M1 and Intel Silicon
This is a quick article that will serve as a brain dump for how I've recently configured my /bin/bash profile for using Homebrew Package Manager with both M1 and Intel Silicon (with x86 emulated using Rosetta).
Installation Locations
Depending on which CPU architecture you are installing Homebrew Package Manager with will determine where brew is installed. By default, brew will be installed to the following locations.
M1 Silicon Installation Path
If you are using brew on Apple M1 silicon, then the default installation script will install Homebrew Package Manager to the following paths.
#!/bin/bash
/opt/homebrew/bin
/opt/homebrew/Caskroom
Intel Silicon Installation Path
If you are using Homebrew Package Manager on Intel silicon, or through Rosetta emulation, then you will notice that Homebrew is installed to the following paths when you use the default installation script that is available from the official homepage.
#!/bin/bash
/usr/local/bin/brew
/usr/local/Caskroom
Configuring Bash
Now that we know where brew is installed, we can configure bash to automatically load the relevant shell environment depending on which architecture is being used. This is useful if you have multiple copies of iTerm2 (for example), whereby one copy may be configured to launch with Rosetta emulation. If your Terminal instance (including iTerm2) is launched with Rosetta emulation, it will automatically attempt to use Homebrew at the listed installation path above (under "Intel Silicon"). However, because both installations are at different paths, we need some logic to detect which architecture (emulated or not) is being actively used, so we know which shell environment to load.
Refer to the logic below. It uses a command called "uname" to detect which CPU architecture is actively in use. Based on the resulting value, it will then load the relevant shell environment. x86_64 is considered to be Intel Silicon, and arm64 is considered to be Apple M1.
Homebrew Shell Environment
The snippet below describes the logic for automatically loading Homebrew shell environment depending on the architecture.
#!/bin/bash
if [[ "$(uname -m)" == "x86_64" ]]; then
	echo "Loading: Homebrew (x86)"
	eval "$(/usr/local/bin/brew shellenv)"
    CONDA_BREW_PATH=/usr/local/Caskroom/miniconda
else
	echo "Loading: Homebrew (ARM)"
	eval "$(/opt/homebrew/bin/brew shellenv)"
    CONDA_BREW_PATH=/opt/homebrew/Caskroom/miniconda
fi
Anaconda Shell Environment
The snippet below describes the logic (typically generated by Anaconda) for loading the relevant shell environment.
#!/bin/bash
if [[ "$(uname -m)" == "x86_64" ]]; then
    # >>> conda initialize >>>
    # !! Contents within this block are managed by 'conda init' !!
    __conda_setup="$('/usr/local/Caskroom/miniforge/base/bin/conda' 'shell.bash' 'hook' 2> /dev/null)"
    if [ $? -eq 0 ]; then
        eval "$__conda_setup"
    else
        if [ -f "/usr/local/Caskroom/miniforge/base/etc/profile.d/conda.sh" ]; then
            . "/usr/local/Caskroom/miniforge/base/etc/profile.d/conda.sh"  # commented out by conda initialize
        else
            export PATH="/usr/local/Caskroom/miniforge/base/bin:$PATH"  # commented out by conda initialize
        fi
    fi
    unset __conda_setup
    # <<< conda initialize <<<
elif [[ "$(uname -m)" == "arm64" ]]; then
    # >>> conda initialize >>>
    # !! Contents within this block are managed by 'conda init' !!
    __conda_setup="$('/opt/homebrew/Caskroom/miniforge/base/bin/conda' 'shell.bash' 'hook' 2> /dev/null)"
    if [ $? -eq 0 ]; then
        eval "$__conda_setup"
    else
        if [ -f "/opt/homebrew/Caskroom/miniforge/base/etc/profile.d/conda.sh" ]; then
            . "/opt/homebrew/Caskroom/miniforge/base/etc/profile.d/conda.sh"  # commented out by conda initialize
        else
            export PATH="/opt/homebrew/Caskroom/miniforge/base/bin:$PATH"  # commented out by conda initialize
        fi
    fi
    unset __conda_setup
    # <<< conda initialize <<<
fi
Configuring iTerm to Launch with Rosetta Emulation
If you are running on Apple M1 silicon, you can still run the same applications with x86 emulation by using Rosetta. You can install Rosetta from the command-line by running the following command.
#!/bin/bash
/usr/sbin/softwareupdate --install-rosetta --agree-to-license
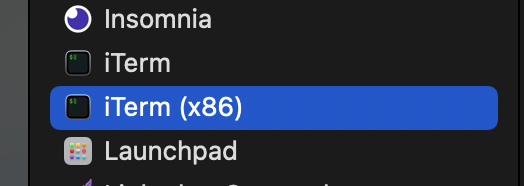
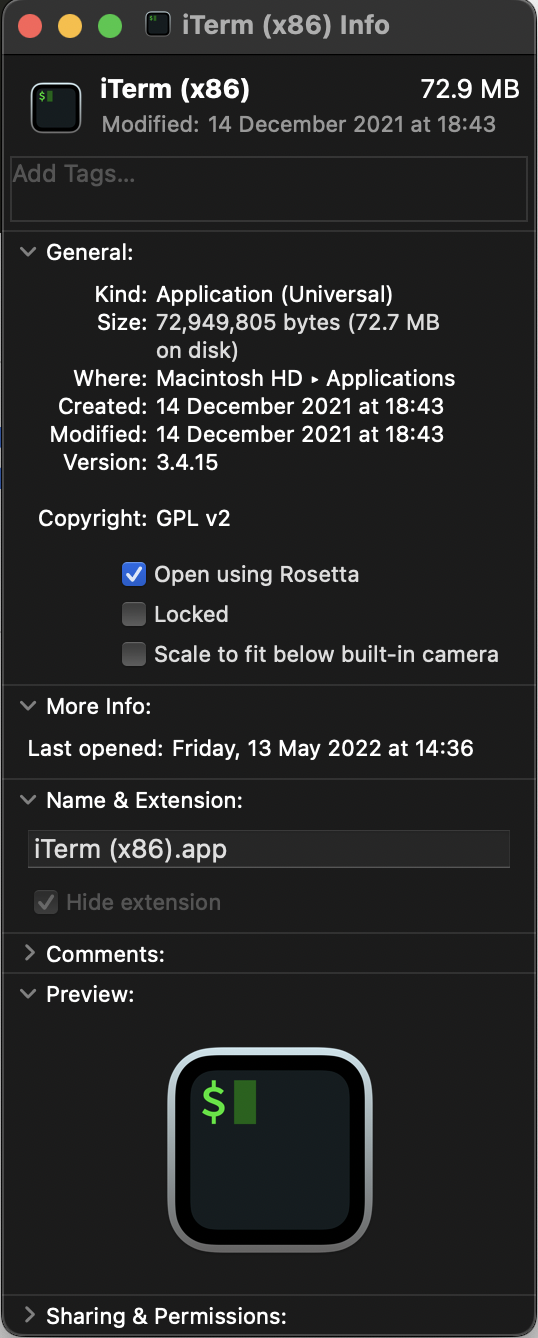
And now you can create a copy of your iTerm installation, and modify the copy to launch with Rosetta emulation. Refer to the screenshots below for greater reference.

A picture of "Applications" in macOS finder, with a duplicate or copy of iTerm.
With your duplicate instance of iTerm, you can then modify the properties so that it launches with Rosetta emulation.

After you've duplicated your iTerm installation and renamed it appropriately, you will then have to modify the properties so that it launches with Rosetta.
Additionally, if you want to be able to interchangeably use either Homebrew installations while using one kind of architecture over the other, then you can make use of the following aliases that can be added to your ~/.profile file. It should be noted that this snippet includes support for pyenv, a tool that is used for managing multiple installations of Python on the same machine.
#!/bin/bash
eval "$(pyenv init -)"
eval "$(pyenv virtualenv-init -)"
alias ibrew='arch -x86_64 /usr/local/bin/brew'
alias mbrew='arch -arm64e /opt/homebrew/bin/brew'
There you have it. You should be able to use Homebrew with both architectures from the same Apple M1 machine.
Comments
Comments
With thanks, I value it!
If some one needs expert view on the topic of blogging
and site-building after that i recommend him/her to pay a quick visit this
website, Keep up the good job.
Рекомендую всем обращаться к <a href=https://psihoterapevt.com.ua/>психотерапевт онлайн</a> по любым вопросам.
All statements other than declarations of present or historical fact are positive declarations.
Also visit my web blog https://charlie4v6v6.blogvivi.com/21466904/%ED%95%B4%EC%99%B8%EC%B9%B4%EC%A7%80%EB%85%B8%EC%82%AC%EC%9D%B4%ED%8A%B8-%EA%B2%80%EC%A6%9D-strategies-that-no-one-else-is-aware-of
На этом сайте можно скачать в mp3 любую песню бесплатно <a href=https://kytim.com/top/soundtrack/>https://kytim.com/top/soundtrack/</a> Кутим.ком - огромная база песен с удобным поиском, прослушиванием и скачиванием.
Appreciate it. Plenty of information!
My web page http://xn--4kqz9dx34awsd.binary-options.site/index.php?qa=11&qa_1=autotrading-2022-%E5%B9%B4-5-%E5%A4%A7%E6%B1%BD%E8%BD%A6%E4%BA%A4%E6%98%93%E7%BD%91%E7%AB%99%E5%92%8C%E6%9C%8D%E5%8A%A1
Howdy! This article couldn't be written much better!
Going through this post reminds me of my previous roommate!
He constantly kept preaching about this. I am going to forward this article to
him. Fairly certain he'll have a good read. Many thanks for sharing!
Good way of telling, and fastidious article to
obtain data regarding my presentation topic, which i am going to deliver in university.
Self-made successful people always <a href=https://nyweekly.com/business/vladislav-soloviev-new-research-blogger/>Vladislav Soloviev CEO</a> attract more of the audience’s attention.
https://clck.ru/349J4j